#Exploring Network Sniffers and VPN Protocols
This article describes my experience working with Wireshark to sniff network traffic and configuring Wireguard protocol to encrypt my network traffic.
#Introduction
Packet sniffing is the process of capturing individual packets as they travel through the network. In this technique, an attacker intercepts the data of other users on the network, allowing them to monitor network traffic and potentially steal unencrypted sensitive information.
Sniffers have been identified as a significant threat due to their ability to provide unauthorised access to sensitive data by eavesdropping on network traffic. These attacks are often stealthy, with the potential to remain undetected for extended periods. Sniffers also serve as valuable tools for gathering information about the local network infrastructure, connected devices, and routine network activity, allowing attackers to plan their strategies effectively.
Several notable examples emphasize the severity of this threat. For instance, in the Heartland breach, attackers installed a sniffer on the payment processing system, capturing card data and payments in real-time as they were being processed. APT29 used a tool called FoggyWeb to configure HTTP-listeners for passive monitoring of all incoming GET and POST requests. In another attack by the DarkVishnya group, they conducted a network scan to collect information about the network and attempted to intercept login data for machines involved in financial transactions.
#Planning our scenario
In our scenario, attackers target hotels in the hospitality industry. They begin by actively scanning the hotel's environment for vulnerable devices or services (T1595.002) that could serve as entry points to the hotel's network. During their scanning efforts, they identify a Cisco router within the hotel's infrastructure known to have a vulnerability in Cisco IOS XE Software Web UI Feature. They exploit this vulnerability (CVE-2023-20198) through public-facing applications (T1190) to gain initial access to the hotel's network. Once they have successfully compromised the local area network, they use network sniffing software to intercept and capture sensitive information (T1040).
In this blog, our primary focus will be on the network sniffing aspect of the scenario. We will pay close attention to the phase where attackers have already breached the network and are actively sniffing for sensitive credentials. There will be one attacker PC running Kali Linux, a victim PC running Ubuntu and a VPN server running on Ubuntu too. The Kali Linux machine will attempt to sniff the traffic of the victim's Ubuntu machine. The objective of the attack is to capture the registration and login details of the victim while they are accessing a website via HTTP during the registration and login process.
Next, the rationale for selecting hotels as the central focus of this scenario is based on the documented history of adversaries specifically targeting hotels, as demonstrated by attacks done by DarkHotel and APT28. Furthermore, the choice to exploit Cisco routers is based on the discovery of a vulnerability in the web UI feature. Recent reports indicate that APT28 has been exploiting similar vulnerabilities in Cisco Routers to conduct reconnaissance and deploy malware. Additionally, in this scenario for the sake of simplicity, we assume that guests are visiting insecure websites using HTTP, thereby significantly increasing their exposure to sniffing attacks.
In this context, the following MITRE Techniques were observed: T1595.002 (Active Scanning - Vulnerability Scanning), T1190 (Exploit Public-Facing Application), and T1040 (Network Sniffing).
#Comparing sniffing tools and VPN Protocols
#Sniffing Tools
To finalise the selection of the sniffing tool, we assessed several options and compared them based on metrics including ease of use, cross-platform compatibility, filtering and search capabilities, and documentation.
| Tool | Ease of Use | Cross-Platform Compatibility | Filtering and Search Capability | Documentation and Support |
|---|---|---|---|---|
| Wireshark | Wireshark has a user-friendly GUI making it easy to monitor and analyze the packets in real time or post-capture. It provides in-depth packet details in an accessible manner, greatly facilitating the task of locating the desired packets. Additionally, it offers exceptional customizability, allowing users to personalize it according to their preferences and concentrate on specific fields of interest. | Available on all platforms | It has excellent filtering and search capabilities. Users can filter traffic by various criteria such as protocols, hosts, ports, IP addresses, and more. It provides strong support for searching through various protocols and offers a user-friendly GUI to aid users in easily filtering packets. Additionally, it features built-in support to assist with packet filtering. | It offers comprehensive documentation that includes a getting started guide and provides an extensive overview of its features and how to analyze network data. Additionally, it provides a wiki for further assistance and offers various educational resources to facilitate learning, including video guides. |
| tcpdump | Tcpdump is a command-line utility which can make it less user-friendly and less intuitive. The absence of a graphical interface can make it more challenging to analyze and identify different packets. | Available on all Unix platforms | It has extensive filtering capabilities and relies on the use of switches (dashes) to specify the type of search you would like to perform. However, being a command-line tool, it can sometimes be challenging to search for a specific part within the captured packets. | It also offers comprehensive documentation, including support for installation and various resources to help users learn the tool. Additionally, it provides a less comprehensive manual page accessible within the terminal. |
| Cain and Abel | Cain and Abel also features a user-friendly GUI with a straightforward interface, making it easy to use. | It was available for Windows XP and has been discontinued. | It provides basic filter functionalities. | Since the tool has been deprecated, very little documentation has been found. |
| Network Miner | It provides a user-friendly interface which is divided into tabs providing different perspectives on the captured data. | Designed for Windows, can run on Linux too. | As a network forensic tool, it offers various search and filter functionalities, including keyword search, anomaly detection, file extraction, and the ability to check if passwords are being transmitted in plain text. | Less comprehensive and basic documentation is provided. Additionally, there are online blogs available that offer more detailed information on how to use the tool. |
| WinDump | It provides a command-line interface like tcpdump, which can make it comparatively more challenging to use and demands familiarity with command-line to effectively utilize the tool. | Available on Windows | It has the same functionalities as tcpdump. | It uses the same documentation as tcpdump. |
After evaluating various tools based on the criteria outlined above, we have opted to use Wireshark as the attacker tool. This choice is primarily attributed to its user-friendly interface, extensive filtering capabilities, and the extensive documentation available online. Wireshark also offers a valuable feature for reconstructing responses and can be used to decrypt traffic as well making it a suitable tool for intercepting, and stealing credentials transmitted on the network. It can also capture traffic from Ethernet Interfaces, Wireless LAN interfaces, Bluetooth interfaces, USB interfaces and virtual Network Interfaces making it highly versatile tool.
#VPN Protocols
Moving forward, our next step involves a comparative analysis of different VPN protocols to determine the most suitable option for configuring a VPN as a security tool. To make this selection, we considered several tools and evaluated them against key metrics: cross-platform compatibility, ease of configuration based on configuring VPN server, security and speed.
| VPN Protocol | Cross-Platform Compatibility | Ease of Configuration | Security | Connection Speed |
|---|---|---|---|---|
| OpenVPN | Compatible with all platforms | Configuring a VPN server can be complex because of its flexibility in providing a wide range of options. Additionally, it can be a time-consuming process, making it less straightforward to set up. | It uses SSL encryption protocol and AES-256 encryption providing robust security. It uses HMAC for integrity checking and allows pre-shared key and certificate-based authentication. | It offers both TCP and UDP transport protocols. The connection speed varies depending on the configuration and the protocol chosen. |
| Wireguard | Compatible with all platforms | Setting up a wireguard server is relatively simple and can quickly get a server up and running. Managing keys and configuring tunnels is also quite easy. | It uses authenticated encryption methods like ChaCha20 allowing for faster encryption and decryption. Poly1305 for integrity checking and public key cryptography for authentication. | It uses the UDP protocol and is designed for speed and efficiency. It is also stable in maintaining a VPN connection. |
| IKEv2 | Compatible with all platforms | Configuring an IKEv2 server is easy especially with platforms which have native support. | It uses IPsec for encrypting the data and hash function to check integrity and its authentication methods include pre-shared keys, public keys, and digital certificates. | It uses UDP protocol and provides fast speeds and excellent stability, even if the connection is interrupted. |
| SSTP | Primarily supports Windows | Configuring an SSTP server can be relatively straightforward in a Windows environment but may require additional effort when setting it up on other platforms, making it less user-friendly to configure on Linux. | It uses AES-256 for encryption. It uses hash functions like SHA-256 for integrity checking and pre-shared keys, digital certificate or public key encryption can be used for authentication. | It uses the TCP protocol and offers decent speed most of the time. |
After evaluating various tools based on the criteria outlined above, we have chosen the WireGuard protocol for configuring our VPN. It offers easy configuration, a quick setup process, and superior speed and stability compared to other options.
To measure the effectiveness of our attacker tool in sniffing passwords and the success of our security tool in preventing it, we considered specific metrics. For the attacker tool, it must be capable of intercepting and capturing HTTP protocol requests. For the security tool, we can utilize Wireshark to verify that communication occurs through the VPN server, ensure packet encryption, conduct a ping test to confirm connectivity with the VPN server's address, and observe the presence of the tunnel virtual interface within the network interfaces.
#Application and Documentation
#Wireshark (Attacker Tool)
Wireshark is pre-installed in Kali, and upon opening it, we can view the available interfaces for packet capture. This list includes both physical and virtual adapters. In our scenario, we will be monitoring traffic on the 'eth0' interface.
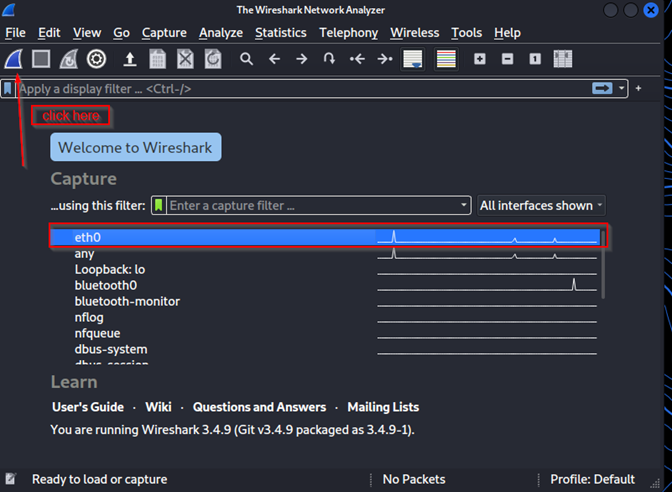
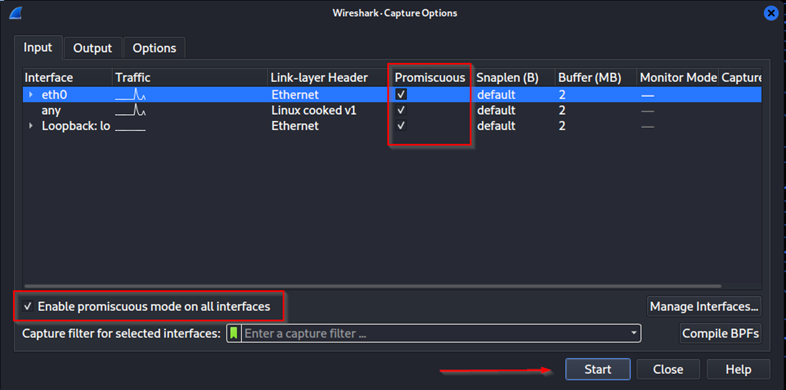
Before commencing the capture, ensure that you've enabled promiscuous mode for all interfaces as shown in Figure 2. This feature enables Wireshark to capture not only its own traffic but also traffic between other devices communicating.
Next, click on the shark fin icon to initiate packet capture on your network. The adjacent line your selected interface, indicates current network activity. A wavy line signifies ongoing traffic, while a straight line, like other interfaces, suggests no traffic on that specific interface.
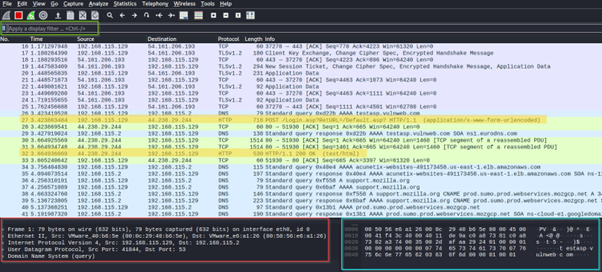
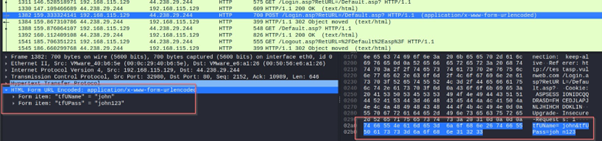
- When packet capture begins, Wireshark captures and displays all network traffic on the screen. We can see the details of the packet as outlined in red and cyan boxes. Additionally, we can observe some http traffic on network highlighted in yellow. The first one appears to be a POST request from a login page, containing login credentials.
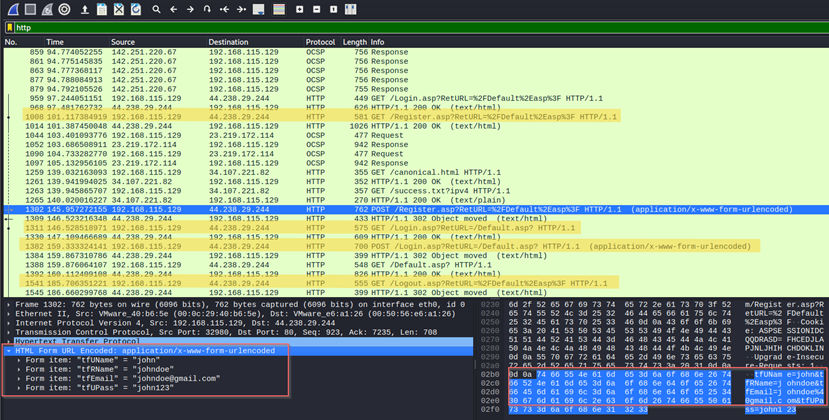
- After observing HTTP traffic, we can use the display filter to exclusively show packets using the HTTP protocol. Upon closer inspection, achieved by clicking on the packet, we can access the packet's detailed information displayed at the bottom of the screen. Given that HTTP transmits data in clear text, this enabled us to successfully intercept and analyse the victim's registration details, as demonstrated below.
#Creating a VPN with Wireguard (Security Tool)
#Configuring a VPN server
- To start, we can install it using
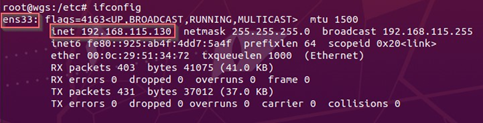
sudo apt wireguard. Also, make a note of your interface and IP address for to input in the wireguard interface configuration file.
- Next, to enable packet forwarding on the server, you need to edit
etc/sysctl.conffile and set the value highlighted to 1.
.png)
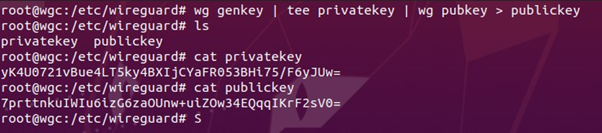
- Now we need to generate the public and private keys on the server, to do that we can use the following command. This command generates a private key using
wg genkey, saves it to a file namedprivatekeywhile displaying it in the console usingtee, and then generates the corresponding public key from the private key withwg pubkey, saving it to a file namedpublickey.
.png)
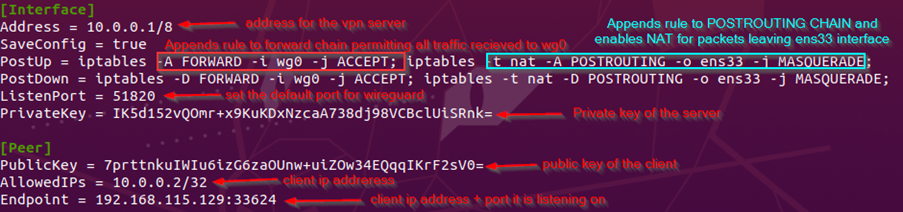
- Next, we will configure the interface by creating a new file in the directory
/etc/wireguard/wg0.conf(where "wg0" is the name of our tunnel interface). In this process, the following options are used:-Ato append a rule to the chain,-Dto delete a rule from the chain,-ito specify the target interface,-jto specify the target action, and-tto specify the table to which the rule is added.
#Configuring Client-Side VPN
- Now, we need to generate the keys on the client side as well using the same command mentioned above.
- Configuring client network interface
wg0.conf.
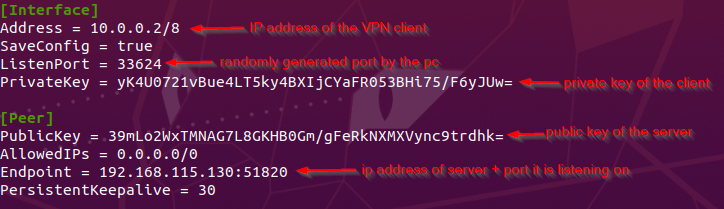
In WireGuard, you can add keepalive command to the interface configuration file to activate Persistent Keepalives, which will address the problem of inactivity and possible connection closure by firewalls or NAT devices while using the stateless UDP protocol. By delivering keep-alive packets on a regular basis, this keeps the connection alive and stops the gateway or firewall from cutting it off for lack of use.
Persistent Keepalives: They send a keep-alive packet every 30 seconds to maintain a connection.
SaveConfig: It is a Boolean parameter that tells wireguard whether to save the configuration of the interface to the file when it is updated.
AllowedIPs: It determines if all traffic goes through the server or only specific traffic is routed through the VPN server. By Using 0.0.0.0, it routes all traffic through the tunnel.
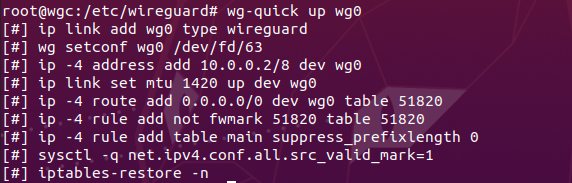
After configuring, start the interface with wg-quick up wg0 to bring up the interface using the wg-quick utility.
Now the VPN client is configured and to allow VPN client to connect on the server, we can use the following command to add allowed connections (peers) to connect to our server:
sudo wg set wg0 peer <clients-publickey> allowed-ips 10.0.0.2/32
#Connecting to the VPN server
- Start the VPN Server using the wg-quick utility. This utility runs thee ‘wg-quick’ script to set up our network interface and aid in managing VPN connections.

- Next, we need to start the network interface on our VPN client.
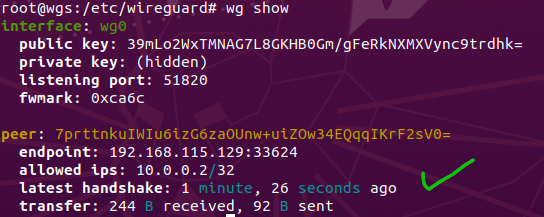
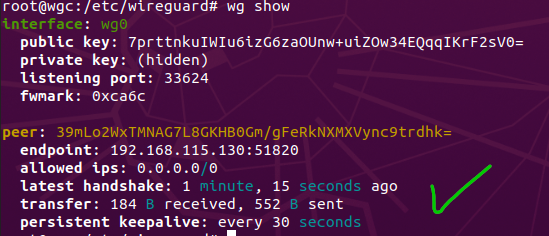
- We can also confirm if everything was successful by
wg show. We can confirm that both sides can communicate and transfer data by looking at transfer.
- The VPN can be disconnected by turning of the network interface using the
wg-quick downcommand: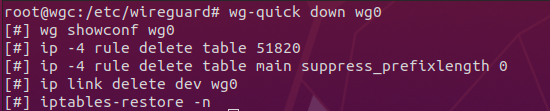
#Trying to sniff network traffic with VPN Enabled
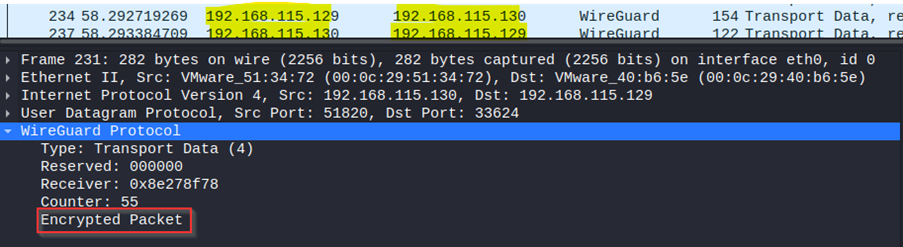
The VPN is effectively encrypting the traffic by tunnelling packets using the VPN protocol. This ensures that communication between the client and server is encrypted, preventing the attacker from sniffing the traffic. In this scenario, the server at 192.168.115.130 is securely transmitting encrypted data to the client at 192.168.115.129.
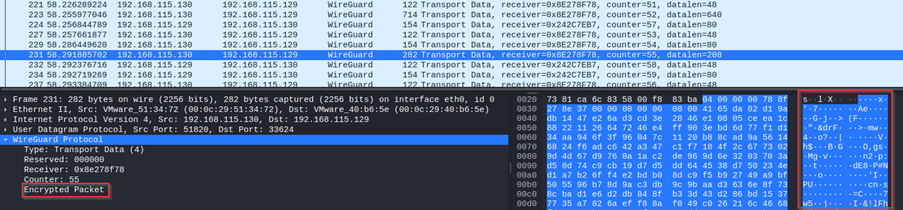
All we can see is encrypted gibberish and cannot figure out the packet contents, thus safeguarding the victim's web traffic. To confirm that the packets are encrypted by right clicking the packet > follow > follow UDP stream.
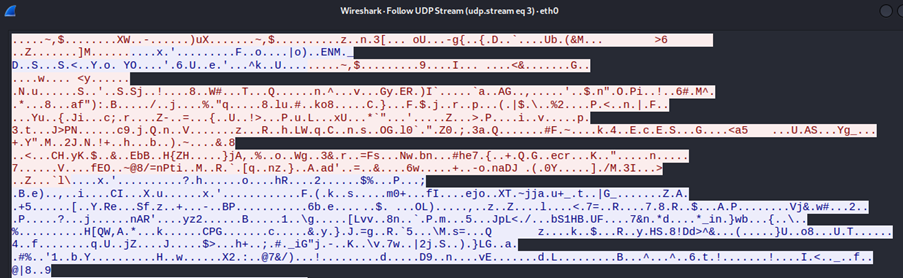
This demonstrates the effectiveness of the VPN tool in mitigating sniffing attacks, clearly showing that the traffic from the victim's PC is securely encrypted using the Wireguard protocol.
#Analysing our Scenario
In the initial phase, the compromise of the hotel's network infrastructure allowed all network traffic generated by guests while visiting websites or browsing the internet to be routed directly through the hotel's routers and switches. This provided attackers with an opportunity to intercept and monitor network traffic using Wireshark, a tool capable of capturing network packets, especially when placed in promiscuous mode.
The HTTP protocol is known for its insecure nature, transmitting data including sensitive credentials like logins and personal information, in plain text. As illustrated below, this plaintext data was captured, enabling attackers to access the contents of these packets.
Upon closer inspection they could see the POST requests being made to /register and /login which gives an indication of the victim sending its credentials to the server for authentication and as it is sent in unencrypted method, they could filter through the captured packets by “HTTP” display filter to see all the requests made using HTTP as shown below and were thus able to capture the request and respond and successfully harvest the login and registration details of the victim.
In the second stage, we proceeded with configuring a VPN for our security tool, aimed at ensuring the confidentiality of transmitted data. Once the victim was connected to the VPN server, a secure, encrypted tunnel was established between the victim's device and the server.
This secure tunnel played a critical role in encrypting internet traffic. It worked by routing the traffic to the VPN server, where it was decrypted, forwarded to the internet, received the response, re-encrypted, and sent back to the VPN client, which then decrypted it to access the messages. Figure 6 illustrates an essential configuration enabling our server to forward packets to the internet, a crucial step for facilitating client communication with the internet.
Additionally, the configuration images above illustrate the tunnel interface configuration, highlighting the role of the AllowedIPs parameter in routing all traffic through the VPN tunnel, ensuring that all traffic from the victim's PC was encrypted.
The security of the VPN tunnel was encrypted using keys generated on both the server and the client. These keys were responsible for encrypting communication between the two devices, adding an extra layer of protection to the data exchange.
The establishment of the VPN tunnel can be proved with the following metrics provided in the first section.
Packet Encryption and Tunnel Verification: Verified using Wireshark that the communication is taking place via the WireGuard VPN tunnel and not the standard network interface. As you can see .130 is the VPN server and .129 is the client machine and they are communicating using the WireGuard Protocol and the traffic between the two PC are being encrypted.
Tunnel Interfaces and Internal Ping Test: Verified that the tunnel interfaces were created and performed a ping test to check if the tunnel interfaces on both pcs are working as they use this interface to communicate securely over the hotel network. (Server is 10.0.0.1)

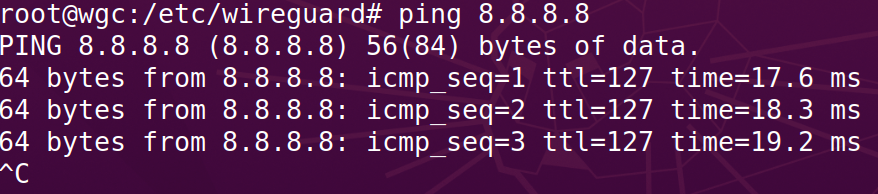
Packet Forwarding and External Ping Test: Ensuring that VPN server has been has turned on the packet forwarder for the client to be able to reach internet through the VPN tunnel by pinging the Google’s public DNS servers.
#Evaluating Our Scenario
In our specific scenario, Wireshark was used for offensive purposes, namely, to intercept network traffic and extract sensitive credentials from the network packets, as depicted in Figure 18. Nevertheless, it is notable that Wireshark can also serve defensive and troubleshooting roles. This includes the detection of malicious network traffic and the analysis of dropped packets for diagnostic purposes.
During the initial phase, our primary focus was on the network monitoring stage, which can be further divided into three key components: monitoring network traffic, packet filtering for HTTP, and credential extraction from HTTP packets. This approach proved effective until we introduced a security measure in the form of a VPN. The VPN was employed to encrypt all network traffic originating from the victim's machine, rendering it exceedingly difficult for potential attackers to access the contents of the packets. This effectively mitigated the threat of packet sniffing. 
The protocol is the backbone of any VPN connection, and it needs to be strong enough as the success of it successfully defending against sniffing attacks depends on the type of encryption used by the VPN protocol. If the encryption is weak or outdated, attackers may decrypt the encrypted packets, rendering the VPN ineffective. In our case, we utilised WireGuard, which uses modern cryptographic algorithms to secure the VPN tunnel, making it a robust choice for protecting against sniffing attacks.
Consequently, the defender tool outperformed the attacking tool, resulting in low security impacts in our scenario, as outlined in the analysis. It's worth noting that the Australian Essential Eight framework does not offer direct mitigations for packet sniffing, and network sniffing is not within the framework's scope. However, by referring to MITRE's Mitigations for Network Sniffing, we can identify various measures to enhance network security. These measures include ensuring the encryption of sensitive information, using best practices for authentication protocol and ensuring web traffic is protected by SSL/TLS, which we used to mitigate the threat in our scenario.
While both MITRE and the E8 framework recommend the use of multi-factor authentication as a common mitigation strategy, it is important to distinguish its purpose from the specific threat scenario being discussed. Multi-factor authentication is a valuable measure for enhancing overall security, as it reduces the likelihood of unauthorized access even if credentials are stolen. However, it does not directly prevent the theft of credentials from network traffic. In contrast, the emphasis on encrypting traffic is a more suitable and direct mitigation measure. By encrypting the data, you make it challenging for attackers to intercept and exploit sensitive credentials in the first place. This approach aligns more closely with addressing the specific threat of credential theft during network sniffing.
In the context of the security landscape, it is worth noting that in the early stages of the internet's development, sniffing attacks were more straightforward due to the prevalence of clear text protocols in nearly every application. This made it relatively easy for attackers to intercept and examine data. However, as the global technological landscape progressed, more robust protocols were introduced, incorporating encryption mechanisms that posed significant obstacles to potential attackers.
As most of the traffic is encrypted using HTTPS, this kind of sniffing is made more challenging in the real world. However, it is important to recognize that attackers have, over time, managed to exploit weaknesses in encryption, particularly in the case of less secure protocols. As we move forward, the need for stronger encryption becomes increasingly apparent. This is because the advent of quantum computers poses a significant threat to modern encryption methods, and particularly to public key cryptography, which may become notably vulnerable to such attacks.